Pages

  • Twitter
  • Google+

zondag 12 mei 2013


After Easter I was left with several of those sort of creepy twisted twigs. I actually like them a lot. I find them a lot more interesting with all their kinks and twists than just a regular stick. Therefore, I wanted to see if I could use the twigs and create something that could possibly be a more permanent addition to our living room

From previous random searches for new craft ideas I had a few ideas I wanted to try. In the end I made 4 Pom-poms and about 8 origami butterflies and attached these to the twigs using floral wire. Really easy, it took me about one saturday afternoon 


Pom-poms
I made the Pom-poms from 5 layers of tissue paper of about 15 x 25 cm. For the full instructions look here.
At first I used Crepe paper, because I had never heard of Tissue paper in the Netherlands and thought it was virtually the same. I wasn't very pleased with the result, the crepe paper was just slightly too... thick I guess. My luck, I had to go to London the next week, had some time to spare at Hammersmith so I visited the Papercraft store. Then I suddenly saw a packet of paper labeled as "Tissue paper". I was curious if it was really different than Crepe paper and took along one packet of blue tissue paper. It feels a lot thinner than Crepe paper and I was definitely more pleased with the resulting Pom-poms. I used floral wire to attach the Pom-poms to the braches. They are very light so I could did not have to stay near the beginning of the branches, but could spread them out across the entire set-up


Butterflies
I think that the butterfly design that I liked best is not the "regular" design. This butterfly has no clear body in the middle, but that was the main reason I liked these best; simple but very recognizable. There are very easy to fold, after only two I could do it on my own. You can find the full folding instructions here
I did use a bit of glue to keep the back properly attached to the front (I think you will understand what I mean when you try to fold one yourself)
I put the floral wire in a fold on the back of the butterfly, left about 5 cm between the butterfly and the point where I twisted the wire around the branch so I could get the effect that the butterfly was "flying" near the branch


I am still not sure if I should add more butterflies, I am afraid it might get too crowded. Perhaps I'll leave it at this for now, I can always add more in a few weeks if I want to :)

I have a cat that just loves to eat everything green and flowery, so the only plant I have in my apartment is tough and prickly. Nonetheless I do love flowers and did still want to have flowers in my room without having to buy those obviously fake ones

I was in an origami mood again and thought that paper flowers would probably be a good substitute for actual flowers. They are not trying to be real flowers and the unique designs from origami make for an interesting bouquet. Also, these do not need any tending to of course ;)

After a few hours of searching for nice flower designs I started making several of the flowers. Not all the designs turned out the way I hoped, but 5 designs did have nice results. 

Using a few strands of ribbon I had left, I made small loops and glued each flower to a loop. I bought some dead twigs at a Garden Center, put them in a vase, hung the origami flowers from the branches and voila, a nice vase full of flowers!


Here are the folding instructions for the 5 flowers I made for my bouquet

Kirigami Flower
The instructions for the Kirigami Flower (it's called kirigami when you have to cut certain parts) can be found here


Cherry Blossoms
The cherry blossoms are made from 5 small 5 x 5 cm square units glued together and are very easy to make. The instructions can be found here


Kusudama Flower
The Kusudama flower is also made from 5 small units glue together. The instructions can be found here


Carambola Flower
This flower is really made from one sheet of paper, but is by far the most difficult to make of the designs here. The results is worth it though. View the video on how to fold one yourself here


8-petal origami flower
The final design consists of two units glued together. The instruction can be found here


I just love the beautiful Washi Yuzen origami paper. Their patterns are so diverse and colorful. Usually it is also quite expensive paper, but while looking for more 'ordinary' origami paper I ended up on PapierEnzo and with 50 small 6 x 6 cm Washi Yuzen sheets, each with a different design. I didn't now yet what to make out of these small sheets, but I ended up ordering the pack anyway


Since I was a kid I always loved to make the origami Crane. It's a fold I never forgot to make and in restaurants I always tend to make a Crane from the napkins...
So, I already knew that I wanted to fold Cranes out the Washi sheets by the time I got the small packet in the mail, but I didn't know what to do with them next. Perhaps hang them on a short piece of string after one another? I just started folding them in the next weeks, sometimes a few per evening, sometimes it was days between two cranes


Then I saw a picture of somebody who had put little Pom-poms on "stems" of floral wire and put it in a vase. Why not swap the Pom-poms for my little cranes? So I got some wire from a garden center, took my tallest vase, cut several long pieces of wire and put a crane on each end (a crane actually has a small hole exactly in the middle of the bottom part, perfect, so I did not have to damage the cranes). And that was it! Really easy once you know how to fold a crane


Now the vase has a nice spot in a corner of our dining table where I can enjoy the whole jumble of unique Washi designs of all the cranes every day :)


I finally moved last year from the small place that I had lived in during my University years to an apartment in Amsterdam where my previous place could easily fit in the new living room. I started out with a lot of empty space, but I loved going to shop for furniture. However, I just wasn't able to find a lamp for above the dining table that I was even remotely happy with

One spring day I was just leaving through a magazine and saw a beautiful origami lampshade and knew that it was exactly the idea that I wanted for the dining table! I was able to find the origami lamp on Etsy and several other models as well. The only problem was that most models where either too small, wrong color or too expensive (shipping to the Netherlands...). So my boyfriend said "Why don't you just create one yourself?"


When I see a square paper I always want to turn it into a Crane, so I did have some experience with origami, but a lamp shade? 
Well, I wanted to try at least, so I set out to find a lamp shade pattern online, which, as it turns out, isn't really out there. Then I spend several hours going trough patterns that weren't intended as lamp shades, but perhaps with some changes could be turned into one. I tried the example on this blog, but it just wasn't the shape I was looking for. Then I came across the pattern for a Magic Ball:


On a Saturday I started a 4 minute YouTube tutorial on the magic Ball with an A4 paper. It did warn me that it would take me several hours, but I have to admit that I just could not imagine how you could spend that much time folding one A4... 4-6 hours later I had my very first Magic Ball

Because the shape was not stiff enough I started making changes to the design. For starters I decreased the number of rows and columns to fold. This significantly decreased folding time to about half an hour, but more importantly, when I tied the top together, the shape was very beautiful and easily remained in shape. It actually had turned into a lamp shade model!


Above you can see several of my prototypes. The one on the bottom right is just the magic Ball pattern with 2 rows (the number of columns follows this). For the other two I made changes to the folding direction of the bottom layer, folding them in the other direction. The bottom left one had two rows, the top one has three rows

Because not all folds are actually needed for the model I started marking the folds that are present in the final design. When made flat again I could clearly see where I should make the folds for the big design (although I do not really remember the reasons for the differing colors, I think it means folds along the rows and columns)


Next, finding the right paper to make models big enough to pass as lamp shades. I tried the regular 220 gram A0 size (cut in half, each half turned 90 degrees and then attached again to make a very wide version) but the paper was too thick to make nice folds.
I had to call about every art shop in the area of Amsterdam to ask if they had dark blue or grey paper in a size between A1 and A0, but not too thick. Eventually I did find a store that had A1 size grey paper, lucky me :)

It still took some time to make the big sized lamp shades, but I am very happy with the result. Now I have my very own one-of-a-kind lamp shades


zaterdag 11 mei 2013


I wasn't actually looking for a new lamp, but when I came across a post on the 3 R's blog showing a standard Chinese Lantern completely covered with the folded fortune tellers I used to make when I was a kid I just had to have it in my house as well!

If you want great suggestions on how to create your own copy of a 40 cm (16 inch) lamp shade with 200 fortune tellers, head over to the 3 R's blog. Here is just my own little story of how I took a bigger sphere with smaller squares (I think) than in the original post and folded over 500 little fortune tellers

I could only find a 50 cm (20 inch) paper lantern in the stores, which was a bit bigger than I had in mind (IKEA was sold out of their 40 cm white Morup), but, hey, how many more fortune tellers would an increase of 10 cm in diameter really be...

Since I did not want to cut all my printer paper into perfect squares (mostly because it would take too much time and I did not trust my paper cutter) I actually ordered a block of those white square memo pages online from an office supplier for about €5. Two days later I had 900 perfectly squares of 9 x 9 cm


I actually did not own a glue gun at the start of this project. I could always get away with the clear glue-for-everything from a bottle, but when I tried to glue a few fortune tellers on the side of the lamp they just kept falling off, so frustrating! 
Next day, I used my lunch time to bike to an art shop near my work and bought a glue gun. If I had know how cheap (and amazing) they are, I would have gotten one ages ago


Then I got into a certain rhythm. Get home from work, dinner, glue on the 30-50 fortune tellers I made the night before onto the lamp, put the table in front of the tv and watch a movie while folding 30-50 new fortune tellers, go to bed

I did time myself sometimes. My fastest was 10 fortune tellers in 20 minutes, but then I wasn't watching a movie. During a movie my folding rate dropped to 10 in 40 minutes (still have to keep track of the story of course). So 500 of them would have taken me at least 20 x 50 = 1000 minutes (about 17 hours), but since I did a lot of them while watching tv, it probably took me more in the range of 20-25 hours of folding

For the glueing part, I could glue about 60 of them onto the lamp in one hour. So 500 would have probably taken me 9-10 hours. I am glad that I did not know that it would take me that long before I started, haha


I started glueing on the "equator" and wanted to make a band, but after one full circle the band had become more of a spiral, not lining up at all. However, in the end, this was rather fortunate, since that way I never had any space left that could not fit an entire fortune teller. I just had to spiral my way all the way up and down

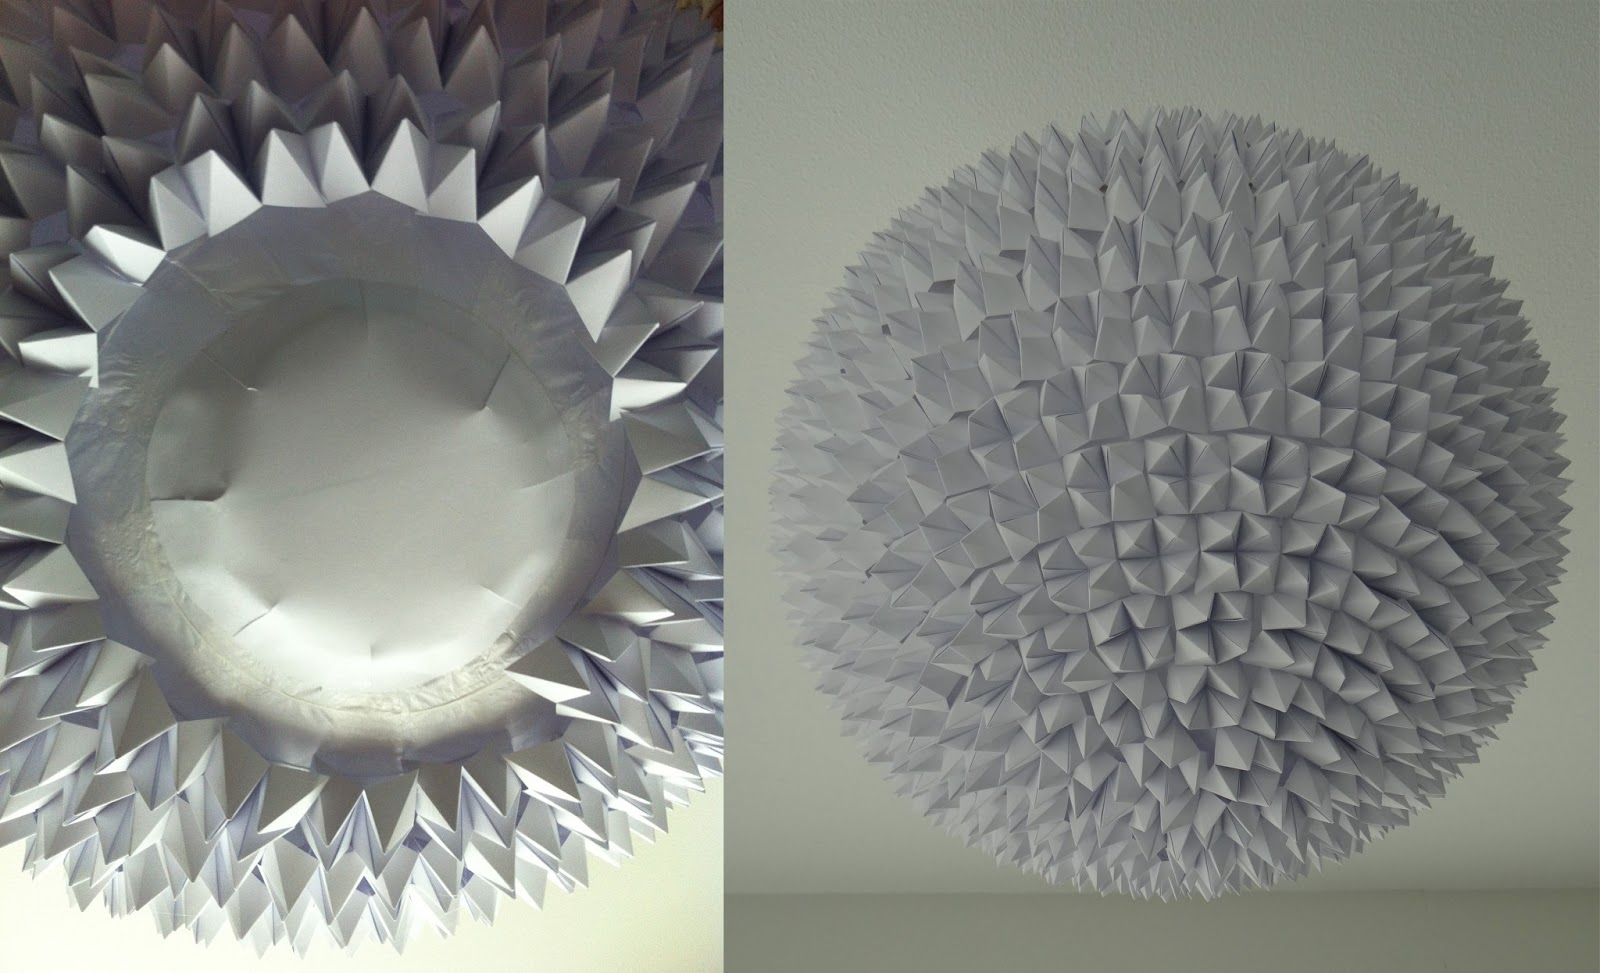
This would mean that at the top and bottom the row would stop rather unsymmetrically. And yes, you can see from the picture below (that shows the top) that it doesn't look very nice. However, since this is the part that you can't actually see once it hangs from the ceiling, I did not mind


The bottom has a similar hole, but to solve the spiral-stopping-suddenly problem and to make the sphere almost complete, I actually cut a paper into a circle and glued this over the hole at the bottom. This way I could easily keep on adding fortune tellers until the entire bottom half was completely covered


I was so happy when every available spot on the original Chinese lantern was covered in small fortune tellers. Even happier when I finally tested it with a light inside to see the play of light through the different number of layers of paper of the fortune tellers that the light had to go through

I had intended the new lamp for the kitchen, but it was just too big and I would almost bump my head against it (with 187 cm (6 feet 3 inches right?) the ceiling is usually rather close ;) ), so I moved our lamp in the bedroom to a vacant spot in the hallway and now this enormous ball of spikes has a lovely spot above our bed


It took much longer than expected and I think it will be at least 20 more years before I fold another fortune teller, but I am so happy with the result that I have no regrets!

Playing a bit with the camera settings to make the play of light even more visible:


(This wasn't the first lampshade I made using origami, see this newer post for an older light based on the Magic Ball)


© 2012. Design by Main-Blogger - Blogger Template and Blogging Stuff